EN
 FR
 DE
 IT
 PT
 ES


Migrating from Adobe to Affinity: a practical step-by-step guide
Switching creative tools seems straightforward until you open that catalog with thirty fonts, an illustration full of effects, or the composite a client wants to keep editing. The important question is not whether Affinity can open an Adobe file, but whether you can finish your work, make changes six months later, and deliver it on the terms you agreed.
This guide takes a project-by-project approach to the transition: preserve your originals, prepare interchange formats, check the results, and discontinue services when you no longer need them. You do not have to convert your entire archive or leave every application behind at once. The aim is to build a reliable workflow, with a fallback for difficult cases and clear criteria for deciding when to move forward.
1. Decide which Affinity you are moving to
Before downloading or buying anything, identify your destination product. As of 2 November 2026, the official Affinity website presents a unified application for vector design, photo editing, and page layout, free for individuals and also available for iPad. Optional Canva artificial intelligence features require a premium plan. This is not the same offering as a standalone Affinity Designer license from an earlier generation.
This distinction affects the entire project: documentation, formats, features, and usage rights must match the installed edition. Record the full name, version number, operating system, and source of the installer. Keep the terms that apply to your account as well. If you work within an organization, check its administration and deployment requirements before setting up workstations.
The listing for second-hand Affinity Designer at Licendi describes a permanent Windows license, with a single installation on one PC, non-transferable and recommended for personal use. It does not specify the version. It may make sense for someone who needs that particular standalone edition, but first confirm the supplied version, the necessary rights, and the activation procedure with the seller. Do not assume it includes access to the unified application, major upgrades, macOS, iPad, or other applications.
Standalone Designer should not be budgeted as a replacement for the whole of Creative Cloud either. Divide your needs into vector drawing, photography, publications, video, and shared services. Decide which part you will move now and which tools will continue to cover everything else.
2. Take stock of projects, dependencies, and deliverables
Start with projects you will work on again. A simple spreadsheet is enough: client, folder, source application, main format, linked assets, fonts, plug-ins, next review date, and required deliverable. Add a column for the person responsible for approving each migration. This prevents a document from being considered finished after a visual check when it still needs acceptance from the person who will edit it.
Divide the archive into three groups: active projects, reusable templates, and completed projects. Prioritize the first group; convert templates once you have a representative test; preserve completed projects without feeling obliged to transform them. Spending a week on documents nobody needs can delay the migration of the commissions that actually pay the bills.
| Type of work | Deciding question | Suggested test |
|---|---|---|
| Logo and icons | Do they need editable curves? | Modify a node and export. |
| Photo composite | Must adjustments remain separate? | Review masks and replace an image. |
| Recurring catalog | Who will update text and prices? | Correct a page and check the layout reflow. |
| Shared campaign | Are native Adobe files required? | Send a sample to your collaborator. |
Read the brief as well: “deliver a PDF” and “deliver an editable INDD” are not equivalent. If the contract requires a particular tool or structure, agree on any changes before production. Do not turn an interchange limitation into the client's problem. For these commissions, keeping Adobe temporarily may be the most efficient option.
For example, imagine a small brand with labels, product photographs, and a quarterly catalog. Do not simply mark it as “compatible.” Create three rows, because each item follows a different route and may require a different application. The labels might pass the test immediately, the photographs might need an effect rebuilt, and the catalog might have to stay in InDesign because the distributor requires it. Separating them turns an abstract discussion about software into useful decisions for the next order.
Finish the inventory by identifying blockers: a font without an approved alternative, an essential plug-in, or a collaborator who will not accept another format. These rows define the real scope of the first phase.
3. Prepare recoverable backups, not just duplicate folders
Before opening files in another application, prepare an archive package. Include the native document, linked images, permitted external assets, the color profiles used, and an approved visual reference. For a publication, save a complete PDF; for an illustration, add a reference image; for a photograph, keep both the original and a finished export.
- Create an originals folder that you will not use for experiments. Give each project a consistent name and a date.
- Gather its dependencies. Check that images exist locally and are not simply links to locations controlled by someone else.
- Generate interchange formats while you can still open the documents in Adobe. Record the relevant settings you used.
- Make a second copy on another storage device or at an independent destination. Check confidentiality policies before using external storage.
- Restore a project from that copy and open it. A backup that has never been restored is still only a promise.
Then separate everything into four folders: originals, interchange, Affinity working files, and deliverables. Avoid names such as “new final final.” Use numbered revisions and a short log: source file, converted file, date, outstanding issues, and approval. This discipline lets you go back without having to guess which document was the right one.
Add a recovery note that can be read without opening any application: where the independent copy is, who can access it, and which file contains the latest approved deliverable. For assets held in shared accounts, identify the owner and ask for permission before downloading or moving them. Also check that the person responsible for recovering a project has legitimate access to the software needed to open the originals; preserving bytes does not resolve every dependency.
Do not delete libraries, settings, or supporting files at the outset. First check what they contain and what you are allowed to export. For shared projects, ask someone else to open the package from a different location: they will spot dependencies your computer resolves automatically but an external recipient might lose.
4. Resolve fonts before correcting the layout
List the families, weights, and styles used, including italics, small caps, and variable fonts. Record where each came from and which license permits installation, sharing, or embedding. Copying a folder of fonts does not establish that you can distribute its contents to a client.
The official Adobe Fonts overview ties its library to a subscription and distinguishes between uses, including embedding in PDFs. Check what your plan allows in third-party applications and what access you will retain after canceling. A visually correct export does not, by itself, resolve the availability of the fonts needed for future changes.
For each subscription-dependent family, consider three options: maintain the access you need, obtain a suitable license elsewhere, or propose a replacement. Do not choose on visual resemblance alone. Test headline lengths, tabular figures, currency symbols, accents, and characters in the project's languages. A replacement that works on a poster may disrupt an entire catalog.
Work on a copy first. Replace fonts through styles where possible, review line breaks, and compare critical pages with the approved PDF. Document the differences that have been accepted. Convert text to curves only in a copy intended for a specific deliverable, where appropriate; keep the editable original, and do not use this approach to hide an unresolved dependency.
Before continuing, require two outcomes: no outstanding font warnings, and approval of visible changes. This avoids spending hours correcting spacing that will change again when the right font becomes available.
5. Move Illustrator files through verifiable interchange routes
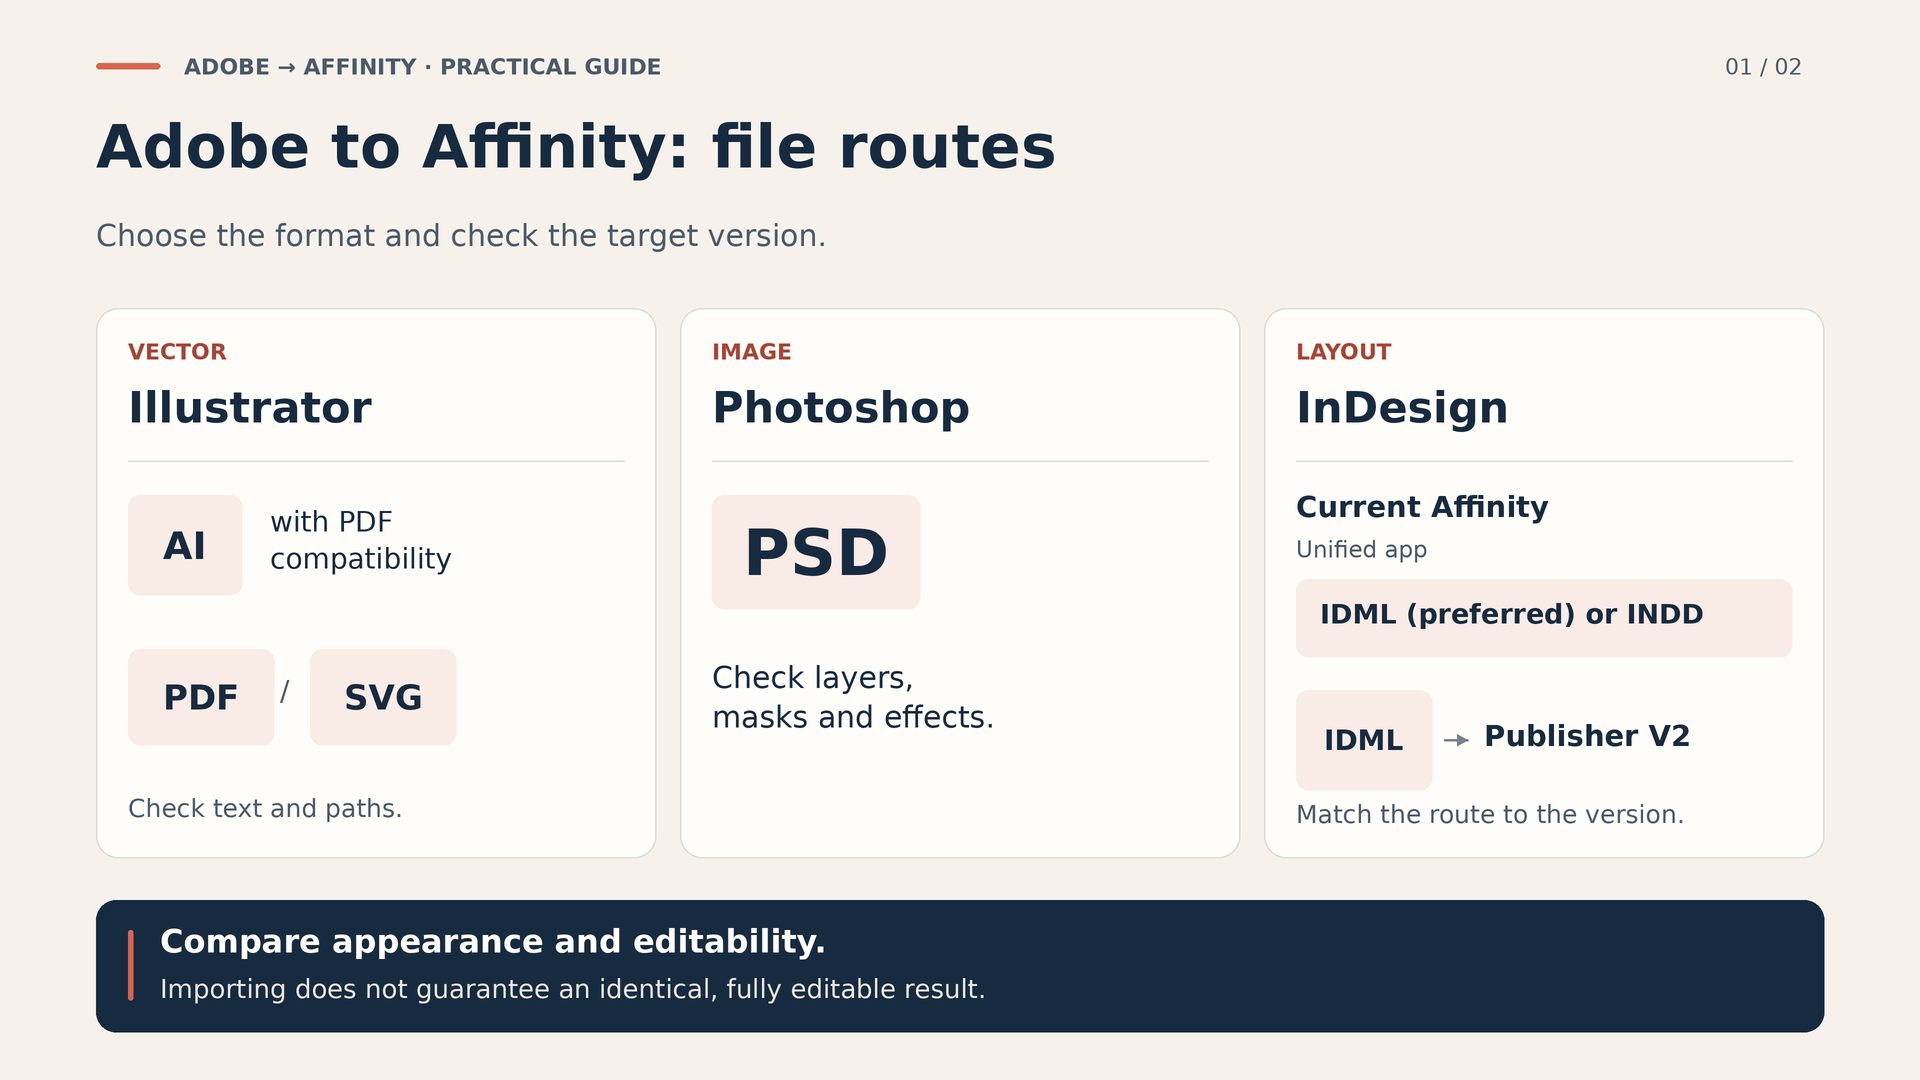
For AI files, start by checking how they were saved. Affinity's official support documentation explains that the application accesses the embedded PDF-compatible content. If it is missing, the documentation says to save the file again from Illustrator with “Create PDF Compatible File” enabled. This gives you a route for interchange, but does not mean the document's entire native structure transfers automatically.
- Open a copy in Illustrator and save with the option to create a PDF-compatible file. Keep the original AI file separately.
- Also prepare a PDF or SVG where appropriate for the work. Clearly identify which file will serve as a reference and which as an interchange file.
- Open the file in your chosen edition of Affinity. Check artboards, dimensions, clipping, transparency, fills, and image placement.
- Select representative objects and modify nodes, text, gradients, and strokes. Do not approve an import simply because its thumbnail looks similar.
- Save the working document and export a sample in the format the client will receive. Reopen that sample in its intended destination application.
With SVG, pay particular attention to the physical size and the relationship between the drawing and its artboard. Include a shape of known dimensions in the test copy and check its size both when opening the file and when returning it. Separate screen tests from those for cutting or production: a result that looks attractive in a browser still needs review by the supplier who will use its curves. Remove the test shape before generating the final deliverable.
Include the most delicate parts of your design in the test: complex appearances, brushes, masks, symbols, and effects. If an element does not retain the editability you need, decide whether to rebuild it or keep a flattened visual version. Make that decision element by element, rather than turning the whole illustration into an image for convenience.
For a workflow focused on illustration in Windows, considering this second-hand Designer license is reasonable after confirming its version, rights, and activation, and checking that this edition handles your files. Testing should come before the purchase decision, not serve as a justification afterward.
6. Review Photoshop files layer by layer
Prepare the PSD with an understandable structure: named groups, important layers identified, and a reference export. Affinity's official file format table documents PSD import and export, but warns that text is rasterized on export. Opening a composite correctly therefore does not guarantee that you can return it with all its editability intact. Check which elements the recipient will need to modify later.
During the pilot, review masks, blending modes, opacity, adjustments, and embedded objects. Toggle groups on and off one at a time; replace an image; change an adjustment; zoom into edges and transparent areas. Always compare against the Photoshop reference at the same size and with consistent color handling.
When a feature does not translate correctly, preserve the original and prepare a visible pixel-based alternative for that part. This might be a merged layer of an effect or a TIFF export of the result. Label it as a rasterized alternative so it is not mistaken for a fully editable element. If the client needs to modify that exact effect, rebuild a solution or keep the corresponding stage in Photoshop.
A practical way to organize the file is to name groups by function: product, background, shadows, and text. If you rebuild a shadow, keep the previous one hidden in a reference copy and record the change in the project log. Do not mix creative corrections with import repairs during the first comparison: otherwise, it becomes difficult to distinguish a deliberate improvement from an accidental difference.
Do not flatten your only file to save time. Treat visual fidelity and the ability to make changes as separate requirements. A composite may pass the first test and fail the second when a seemingly small request arrives, such as changing a headline or replacing a product's packaging.
Finally, return a test PSD to the person who will use it. Ask them to make a real change and export it again. That full round trip reveals problems that do not appear when you only import in one direction.
7. Distinguish current INDD support from IDML in Publisher V2
Do not automatically follow guides claiming that Affinity never opens INDD. The official update of 15 September 2026 announces native INDD import in desktop Affinity, alongside scripting and the Blend Tool. That capability belongs to the updated product: it does not establish that an older Designer license includes page layout or these features.
The current InDesign import guide recommends using IDML when you still have access to InDesign, and keeping INDD as an alternative when you only have the original. Export the IDML before canceling, therefore. For an older destination application, the Publisher V2 help documents IDML as the import route, followed by saving as an .afpub file. Always identify the destination version before preparing interchange files.
In both cases, retain the INDD, its linked images, and an approved PDF. Before importing, check that the source document has no missing assets. Then review page size, margins, bleed, master pages, styles, numbering, tables, and text flow. Do not limit the inspection to the cover: also select a dense page, one with tables, and one with cropped images.
Make a deliberate correction: extend a paragraph, change a figure, and replace a photograph. Check how the document reflows and whether any text overflows. For longer publications, compare every exported page and record issues by page number.
Importing into the current application requires saving an .af document: it does not let you return changes as INDD or IDML. If someone else needs to continue in InDesign, agree on an alternative deliverable or keep that part of the editorial workflow in Adobe. Test collaboration before changing the master file.
8. Treat photography, plug-ins, and automation separately
If your work starts with RAW, prepare a sample from the cameras you actually use: different sensitivity settings, challenging lighting, skin tones, and your usual lenses. Preserve originals and reference exports. Compare exposure, white balance, detail, and lens corrections; do not measure success solely by whether a file opens.
Plan the photographic archive and RAW processing separately. Record how you will find images, preserve selections, and deliver finished versions. Do not assume that moving a photograph reproduces a catalog, its history, or adjustments from another RAW processor. Decide which information you need to retain and check that you can recover it before changing your daily workflow.
For plug-ins, create a table listing name, version, function, and alternative. The Photo 2 plug-in documentation covers compatible 64-bit Photoshop plug-ins, but warns of possible problems and recommends testing them. For another edition, consult its specific documentation and that of the plug-in manufacturer. Installing it or seeing it in a menu is not enough: run it on representative copies and verify the exported result.
Treat automations as small, independent projects. Write down the inputs, the operation performed by each step, and the expected output. Although the current application includes scripting, do not assume that it will run actions or scripts created for Adobe unchanged. First reconstruct the manual procedure; then automate a stable task, test foreseeable errors, and keep a reference result.
Prioritize frequent operations. Automating a weekly export may offer more value than reproducing a complex action used once a year.
9. Set up a comfortable, repeatable working environment
Do not try to learn every tool during your first commission. Prepare a list of ten common operations: selecting, transforming, editing nodes, aligning, working with text, creating masks, adjusting color, organizing layers, exporting, and recovering a revision. Practice them on a small document until you can complete them without constantly interrupting your work.
Configure units, panels, shortcuts, and save locations around your tasks. Keep a personal reference sheet of equivalent operations, rather than an endless comparison of menus. If an operation has a different name, record its purpose: “crop non-destructively,” “modify the outline,” or “export each item.” This helps you learn the new workflow instead of looking for an exact copy of the old one.
Then convert a simple template: correct dimensions, a minimal set of styles, identified colors, and clear names for the elements that will change. Have someone else use it without verbal instructions and note where they get stuck. That test is worth more than an attractive template only its creator understands.
If you choose Designer for a Windows workstation, verify before buying that the confirmed version and rights suit that workstation and that you know how activation works. Build templates in the exact edition you will use, not another one whose compatibility you are merely assuming.
10. Control color, printing, and the output PDF
Record the original document's color mode and ICC profile before converting it. The Photo 2 color management guide explains the role of profiles and recommends consulting the print provider when choosing an appropriate CMYK profile. Use that conversation to establish specific conditions, rather than applying a universal recipe to every paper and printing process.
Explicitly include RGB or CMYK in the project record and delivery specification. If a file arrives without an identified profile, stop the conversion and look for a reliable reference at the source. Avoiding an arbitrary assignment is just as important as choosing the correct output profile. Keep a copy before any change so you can compare and correct the result.
For digital assets, agree on dimensions, output profile, transparency, and format. For print, ask for the final size, bleed, required resolution, spot color handling, ink limits, and PDF standard. Document who should perform the color conversion. Avoid repeated conversions simply because each application offers a different setting.
Affinity documents its export settings, including PDF/X compatibility options. Use presets as a starting point: check every setting against the supplier's instructions. Do not assume that selecting PDF/X automatically includes bleed or every condition of your order.
- Export a sample with representative pages and a name that identifies the revision.
- Open it outside the working document and check dimensions, pages, clipping, fonts, and transparency.
- Review separations, inks, and overprinting with tools appropriate to the intended destination.
- Request a print proof when color or finishing is critically important.
- Save the accepted settings with the project and repeat the checks after significant changes.
If the printed result differs from the reference, investigate profiles, export settings, and proofing conditions first. Changing colors by eye to compensate for a different display can conceal the problem and harm the next print run.
11. Approve a complete pilot before expanding
Choose a small, representative project without an urgent deadline. It should include at least one common difficulty: demanding typography, effects, linked assets, or print requirements. Avoid examples that are artificially easy or too complex for this test.
Define acceptance before you begin. A useful checklist might include the following checks:
- Completeness: all expected pages, images, and items are present and correctly positioned.
- Appearance: text, color, and effects match the reference, or any changes have been explicitly approved.
- Editing: you can make foreseeable corrections without rebuilding the entire document.
- Delivery: the recipient opens the agreed format and completes their part of the work.
- Recovery: another copy allows you to restore the project with its dependencies.
- Time: you have measured preparation, conversion, review, and corrections, not just the initial opening.
For comparison, set the references to identical dimensions and go through the document twice. On the first pass, look at the overall result: proportions, pages, and hierarchy. On the second, zoom into small text, edges, transparency, and critical details. If several people are involved, assign the second pass to someone who did not perform the conversion. Log each issue with a screenshot, its location, and the expected result, to avoid corrections based on imprecise recollections.
Classify issues as blocking, fixable, or accepted. Assign a solution and an owner to each one. If the document only works after extensive repair, restrict that route to the type of work that genuinely justifies it. A clearly defined partial migration is preferable to a complete switch full of improvised exceptions.
Then repeat the pilot with a different second project. Look for patterns: which settings can become a template, which elements need preparation beforehand, and which commissions should temporarily remain in Adobe.
12. Test delivery and the return journey
Prepare a package that someone outside the project can understand: the working document where appropriate, final formats, authorized assets, and a short note stating the version, required fonts, and known issues. Separate editable files from those intended only for viewing or printing.
The supported formats table does not offer native AI export either. A PDF or SVG is not equivalent to delivering the Illustrator original. Define a test for each deliverable: SVG size and appearance, PDF pages and production suitability, PSD structure and editability. Do not change an extension to make a file appear to be another format. The recipient must be able to do the agreed work.
Ask for a real return test: correcting a headline, repositioning an image, or updating a table. Then reopen the returned file and export it again. If anything is lost, identify which direction causes the loss and revise the interchange agreement. Sometimes supplying separate vector originals is enough; other times, it makes sense to keep part of the project in Adobe.
Also check compatibility between Affinity generations: the current application opens V1 and V2 documents, but its new files cannot be opened in those older versions. Preserve the originals and agree on the working version with your collaborators before replacing a master file.
Only make the route part of your regular process once the recipient confirms they can continue. Internal approval does not replace a check by a print provider, collaborator, or client with different needs.
13. Plan the transition and cancel at the end
As an indicative schedule for a professional with a manageable archive, devote the first week to the inventory and backups; the second to fonts and pilots; the third to small commissions; and the fourth to reviewing deliverables and outstanding dependencies. This is not a promise about duration: extend each phase if you handle long publications, many collaborators, or automated processes.
Set aside learning sessions and time to resolve issues. Avoid migrating a critical template the day before delivery. Calculate the total effort: preparation, training, rebuilding, testing, and any services you will continue to need. Compare the savings against that work, not just against a subscription fee that disappears.
If the pilots confirm that you need a particular standalone edition, you can review Licendi's Affinity Designer offer with an informed decision in mind. First finalize confirmation of the version, rights, and activation; if you want the free unified application, this purchase must not be presented as a requirement for obtaining it.
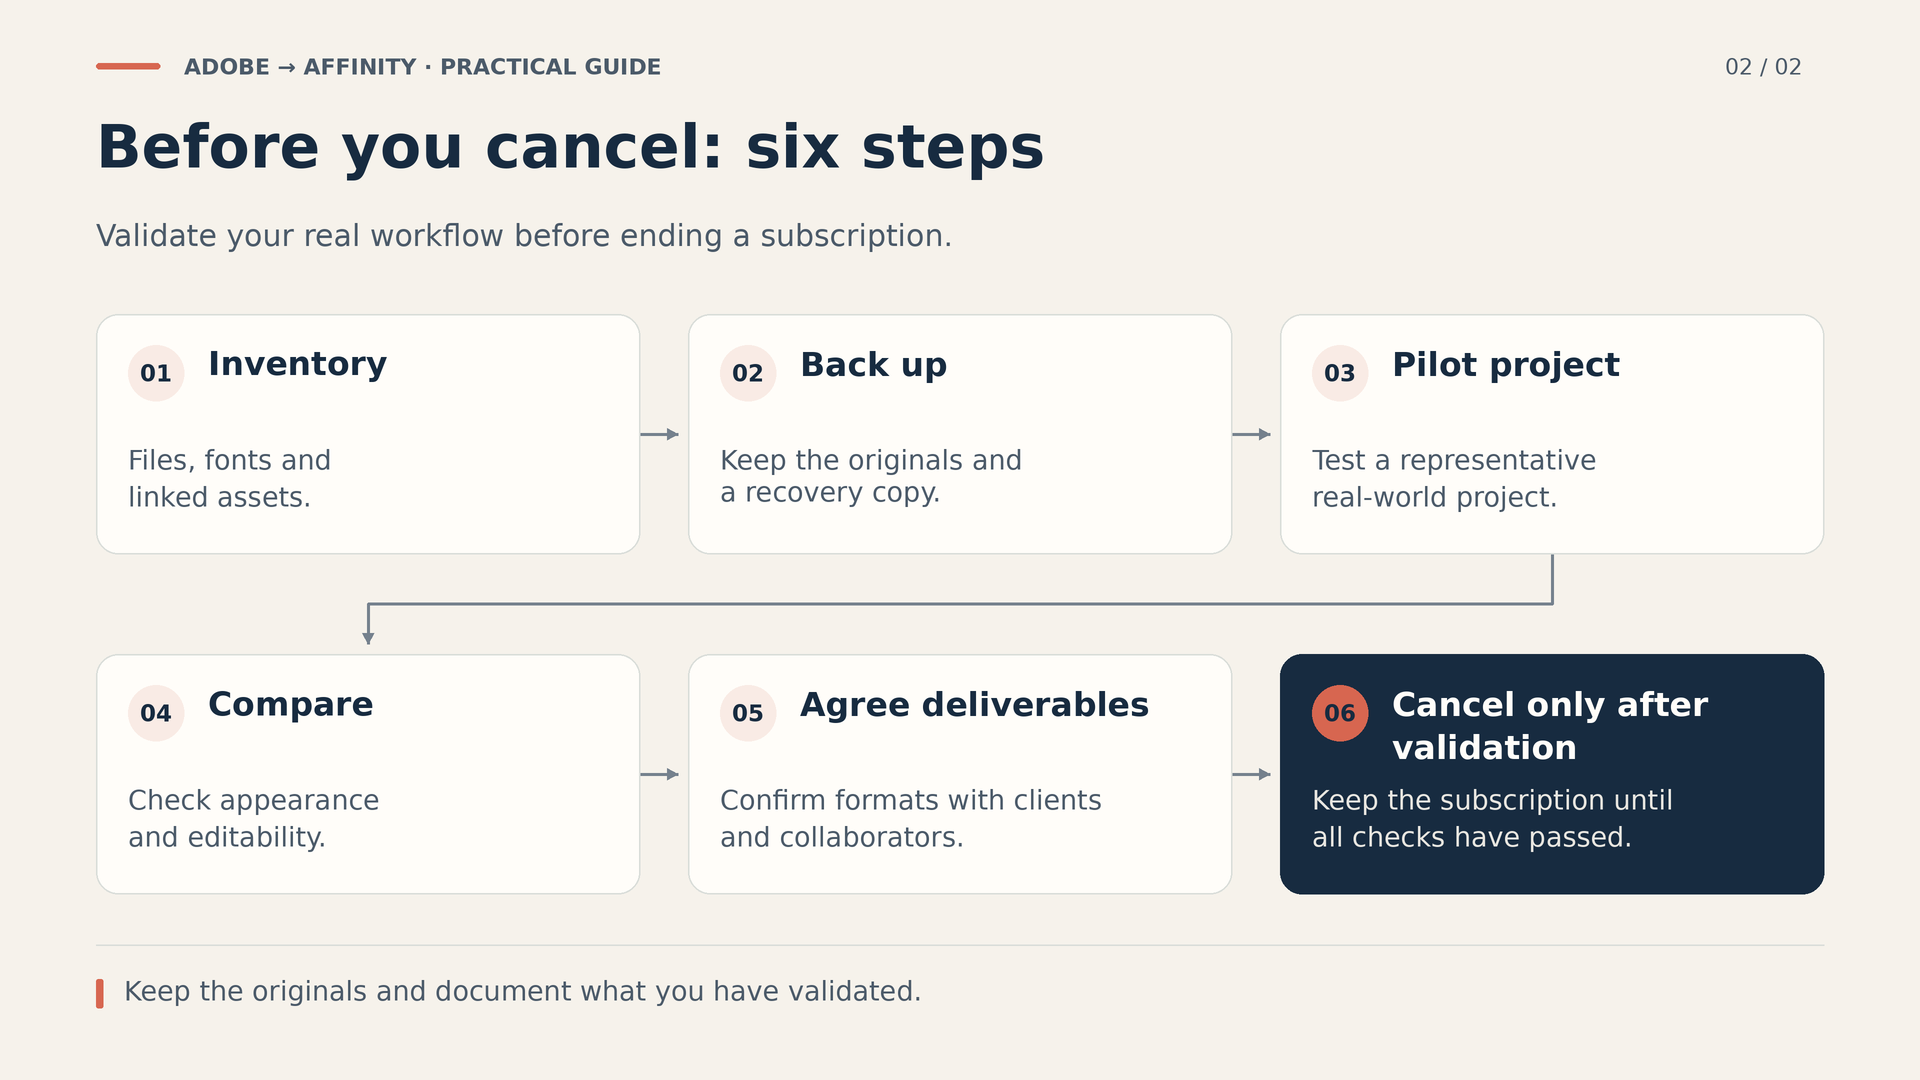
Before canceling Adobe, check three things: recoverable files, accepted deliverables, and resolved dependencies. Review your account for the subscribed plan, country, renewal date, possible charges, and effects on the services you use. Adobe's subscription terms depend on the plan type and applicable jurisdiction; paying monthly should not automatically be confused with having a month-to-month contract.
Follow the official cancellation procedure and keep the confirmation. Check what will remain accessible, and for how long, before removing files from associated services. Do not delete your account or uninstall tools as the first step in the migration.
Also schedule a review after the first complete work cycle. Count how many commissions you have completed, which problems recur, and how much time they take. Update templates and retire only those old steps that already have a tested replacement. If a significant exception appears, keep a specific route for it without undoing everything that already works.
The switch will be successful when you can confidently produce, revise, deliver, and recover your work. Getting there in stages is not stopping halfway: it protects your archive and professional relationships while you adopt a new way of working.
Official sources and reference documentation
- Affinity: current application and platforms.
- Affinity: September 2026 updates.
- Affinity: importing AI files.
- Affinity: supported formats.
- Affinity: choosing between INDD and IDML.
- Publisher V2: importing via IDML.
- Adobe Fonts: library and uses.
- Photo 2: using plug-ins.
- Photo 2: color management.
- Affinity: export settings.
- Adobe: applicable subscription terms.
- Adobe: how to cancel a subscription.