BitLocker: Encrypt Your Hard Drive Step by Step
The security of our personal and professional data has never been more important than it is today. Every day we hear news about information theft, massive hacks, and data losses that affect both large corporations and individual users. In this context, full disk encryption has become a fundamental tool for protecting our sensitive information, and Microsoft's BitLocker is one of the most robust and accessible solutions available on the market.
In this comprehensive guide, we will explain everything you need to know about BitLocker: from what it is and how it works, to how to activate it step by step on your Windows computer. Whether you are a home user concerned about the privacy of your personal files or a professional handling confidential information, this guide will provide you with the tools you need to effectively protect your data.
Table of Contents
- What is BitLocker and How Does It Work
- Why You Should Encrypt Your Hard Drive
- System Requirements for BitLocker
- How to Check if Your PC Has TPM
- How to Enable BitLocker Step by Step
- Unlock and Authentication Methods
- Recovery Key Management
- BitLocker To Go: Encrypt USB Drives
- How to Manage and Disable BitLocker
- Troubleshooting Common Issues
- Security Best Practices
- Frequently Asked Questions
What is BitLocker and How Does It Work
BitLocker is a full disk encryption technology developed by Microsoft and included in the Professional, Enterprise, and Education versions of Windows. It was first introduced in Windows Vista and has evolved significantly over the years, becoming one of the most reliable security tools integrated into the operating system.
BitLocker works by encrypting all the contents of a storage drive, including the operating system, system files, and all user data. It uses the AES (Advanced Encryption Standard) encryption algorithm with 128 or 256-bit keys, which is the same standard used by governments and military organizations around the world to protect classified information.
When BitLocker is enabled, all data written to the disk is automatically encrypted, and all data read is decrypted transparently to the user. This means you can work with your files normally without noticing any difference in performance or usability, but if someone tries to access your disk without authorization, they will only find unreadable data.
Key Components of BitLocker
BitLocker uses several components to ensure maximum security:
- TPM (Trusted Platform Module): A security chip integrated into the motherboard that securely stores encryption keys and verifies system integrity during boot.
- Volume Encryption Key (VEK): The key used to encrypt and decrypt the disk data.
- Volume Master Key (VMK): An intermediate key that protects the VEK and can be unlocked through different authentication methods.
- Recovery Key: A 48-digit key that allows access to data in case you forget your password or there are problems with the TPM.
Why You Should Encrypt Your Hard Drive
In an increasingly digital world, the amount of sensitive information we store on our computers is impressive: from personal photographs and financial documents to access credentials and private communications. Encrypting your hard drive with BitLocker offers multiple benefits that go beyond simple protection against hackers.
Protection Against Physical Theft
One of the most common scenarios where BitLocker proves its value is in case of device theft or loss. If someone steals your laptop, they can extract the hard drive and try to access your data by connecting it to another computer. Without encryption, all your files would be completely exposed. With BitLocker enabled, the thief will only find encrypted data impossible to read without the correct key.
Regulatory Compliance
Many industries are subject to strict data protection regulations. The General Data Protection Regulation (GDPR) in Europe, HIPAA in the US healthcare sector, and other similar regulations require appropriate technical measures to protect personal information. Using full disk encryption like BitLocker is one of the most effective ways to comply with these requirements.
Privacy Protection
Even if you don't handle sensitive corporate information, your personal privacy deserves protection. Emails, chat conversations, browsing history, personal documents... all this information can be used maliciously if it falls into the wrong hands. BitLocker ensures that only you can access this data.
Peace of Mind When Disposing of Equipment
When the time comes to replace your computer, encryption makes the secure disposal process easier. Even if you don't perform a complete disk wipe, the data will remain protected by encryption, significantly reducing the risk of someone recovering your information from the old equipment.
System Requirements for BitLocker
Before proceeding to enable BitLocker, it's important to verify that your system meets the necessary requirements. Not all computers can use all BitLocker features, although there are alternatives for systems that don't meet all requirements.
Software Requirements
BitLocker is available in the following Windows editions:
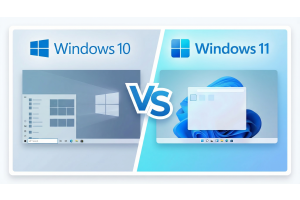
- Windows 11: Pro, Enterprise, Education
- Windows 10: Pro, Enterprise, Education
- Windows 8/8.1: Pro, Enterprise
- Windows 7: Enterprise, Ultimate
If you have Windows Home, unfortunately you won't be able to use BitLocker. However, you can consider upgrading to Windows Pro to gain access to this and other advanced features. At Licendi we offer Windows licenses at competitive prices that will allow you to access all advanced security features.
Hardware Requirements
To use BitLocker with all its features, your computer must have:
- TPM version 1.2 or higher: Preferably TPM 2.0 for maximum security. Most computers manufactured after 2016 include TPM 2.0.
- BIOS or UEFI firmware compatible with TCG: Must support trust chain measurement during boot.
- Two disk partitions: A system partition (at least 350 MB) and a Windows partition. The Windows installer normally creates these partitions automatically.
BitLocker Without TPM
If your computer doesn't have TPM, you can still use BitLocker, but with some limitations. In this case, you'll need to use a USB drive as a startup key or configure a pre-boot password. This method is less convenient but still provides solid protection for your data.
How to Check if Your PC Has TPM
Before attempting to enable BitLocker, it's recommended to verify if your computer has a TPM chip and what version it is. There are several ways to do this check:
Method 1: Using the TPM Manager
- Press Windows + R keys to open the Run dialog.
- Type tpm.msc and press Enter.
- The TPM Management console will open.
- If your computer has TPM, you will see information about the manufacturer and version. If it doesn't have TPM, you will see a message indicating that no compatible TPM was found.
Method 2: From Windows Settings
- Open Settings (Windows + I).
- Go to System > About.
- Click on BitLocker settings or search for Device encryption.
- If device encryption is available, your computer has TPM.
Method 3: Using Device Manager
- Right-click on the Start button and select Device Manager.
- Look for the Security devices category.
- If you see Trusted Platform Module 2.0 (or similar), your computer has TPM.
How to Enable BitLocker Step by Step
Once you've verified that your system meets the requirements, you can proceed to enable BitLocker. The process is relatively simple, but it's important to follow each step carefully to avoid problems.
Step 1: Access the BitLocker Control Panel
- Open the Control Panel (you can search for it in the Start menu).
- Click on System and Security.
- Select BitLocker Drive Encryption.
Alternatively, you can right-click on the drive you want to encrypt in File Explorer and select Turn on BitLocker.
Step 2: Select the Drive to Encrypt
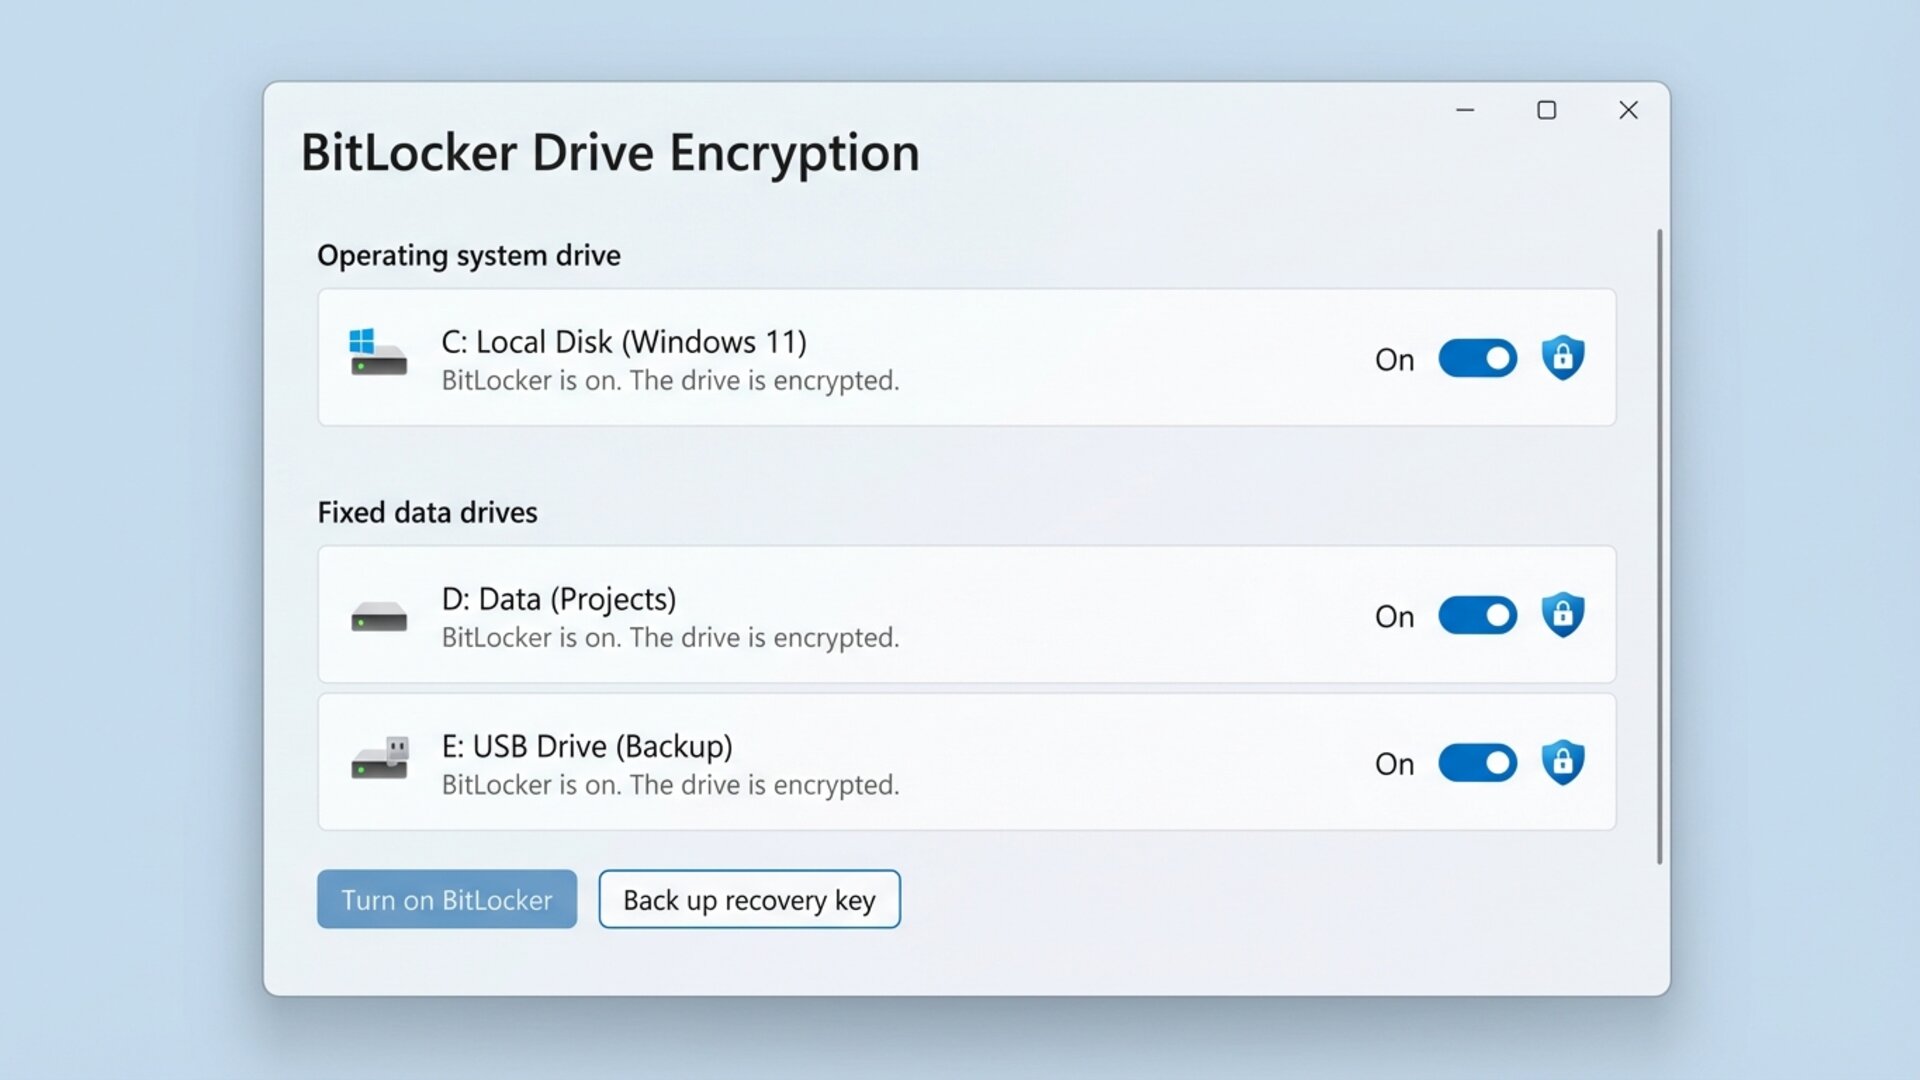
In the BitLocker panel, you'll see all the drives on your system. The operating system drive (usually C:) will appear first. Click on Turn on BitLocker next to the drive you want to protect.
Step 3: Choose the Unlock Method
BitLocker will ask you to choose how you want to unlock the drive during startup. The available options will depend on your hardware:
- Use TPM only: Unlocking is automatic if the system detects no suspicious changes have occurred. It's the most convenient option.
- Require startup PIN: You'll need to enter a numeric PIN each time you turn on the computer. Offers additional security.
- Require startup key: You'll need to insert a specific USB drive to boot the system.
- Require PIN and startup key: Combines both methods for maximum security.
Step 4: Save the Recovery Key
This is one of the most important steps in the process. BitLocker will generate a 48-digit recovery key that you'll need if you forget your PIN or if there are problems with the TPM. You have several options to save it:
- Save to your Microsoft account: The key is stored in the cloud and you can access it from account.microsoft.com/devices/recoverykey.
- Save to a USB drive: A text file with the key is created on the USB drive.
- Save to a file: You can save the key to any location (except on the drive you're encrypting).
- Print the key: You get a physical copy that you can store in a safe place.
Recommendation: Use at least two of these methods. Saving the key to your Microsoft account is convenient, but it's also a good idea to have a printed copy stored in a safe place like a safe.
Step 5: Choose How Much of the Disk to Encrypt
BitLocker offers you two options:
- Encrypt used disk space only: Faster, ideal for new computers or freshly formatted disks. New data will be automatically encrypted as it's written.
- Encrypt entire drive: Slower but more secure, especially for computers that already have data. Ensures that even previously deleted data is protected.
For most users with computers already in use, we recommend encrypting the entire drive.
Step 6: Choose the Encryption Mode
In Windows 10 and 11, you'll need to choose between two encryption modes:
- New encryption mode (XTS-AES): More secure, recommended for fixed drives that will only be used on this computer.
- Compatible mode: Uses AES-CBC encryption, compatible with older Windows versions. Recommended for removable drives you might use on other systems.
Step 7: Start Encryption
Before starting, BitLocker will ask you to run a system check to make sure everything works correctly. Check the Run BitLocker system check box and click Continue.
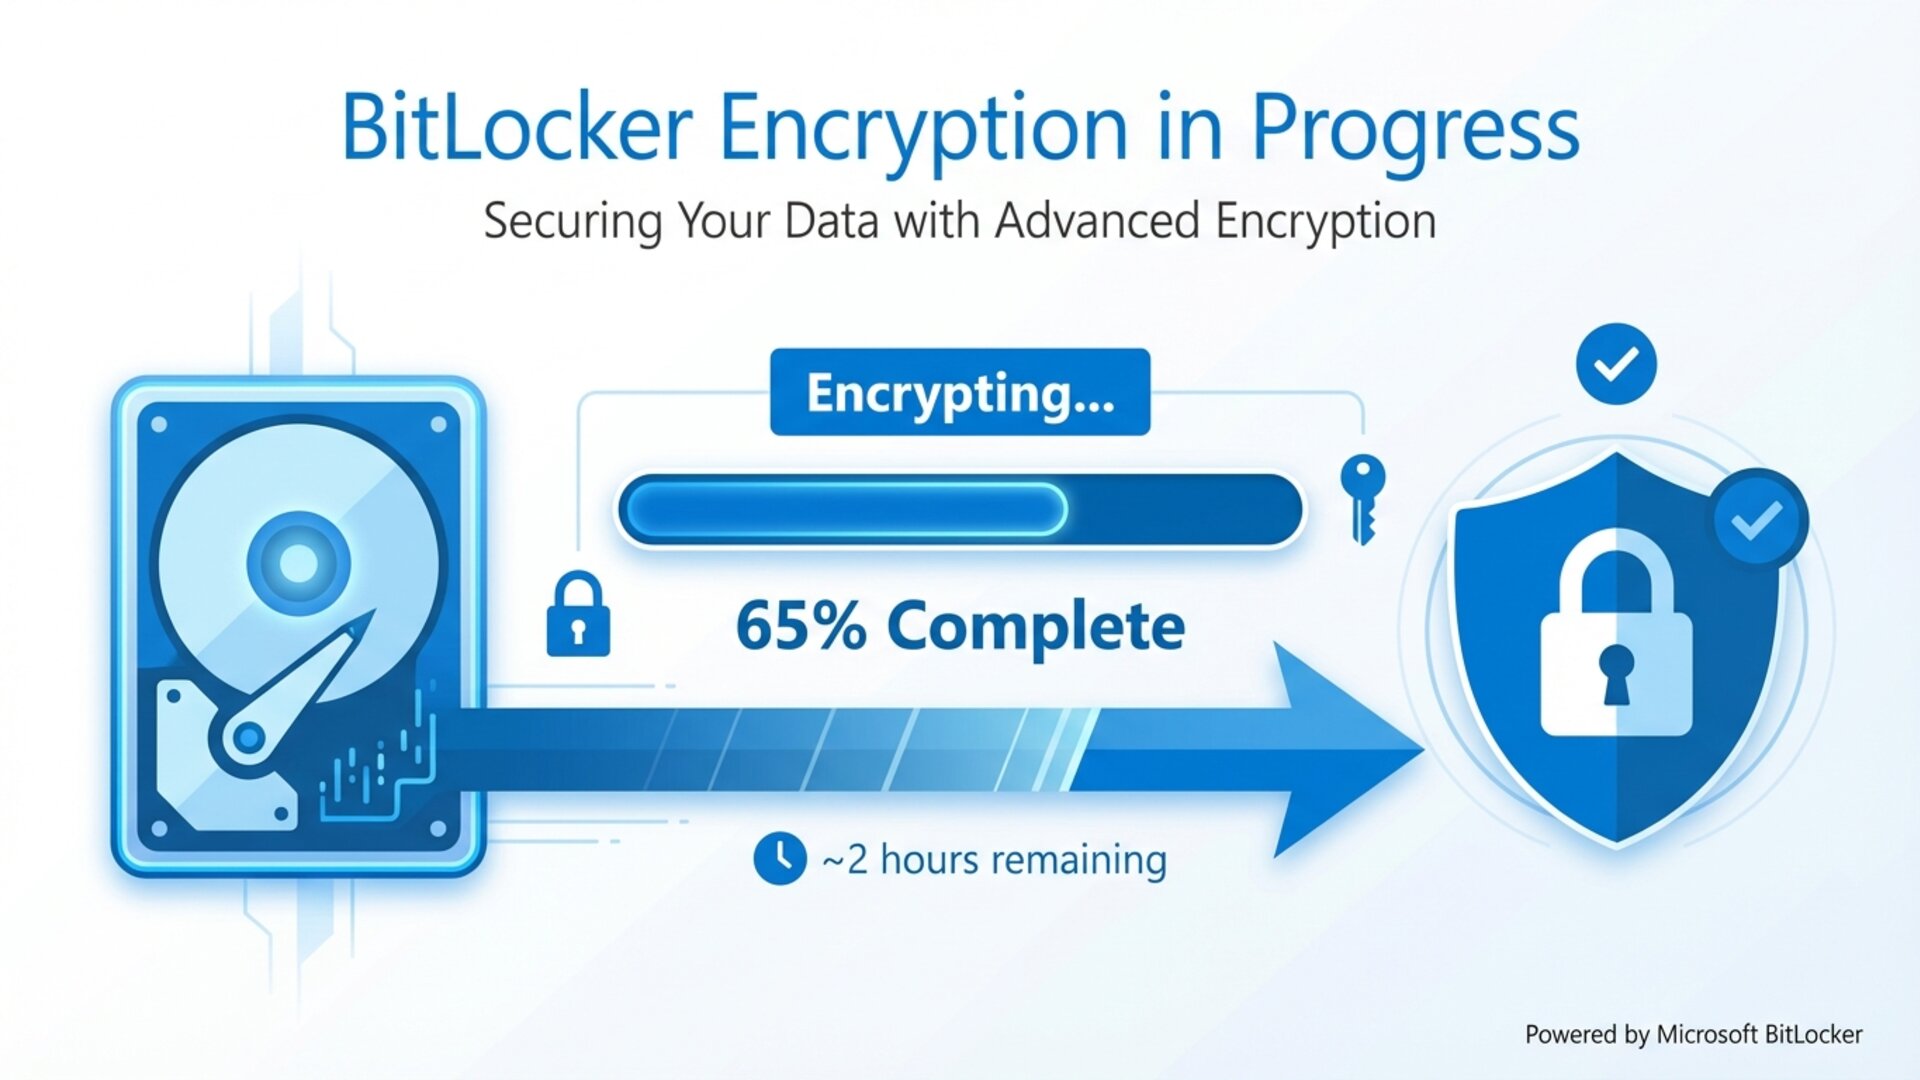
Your computer will restart and begin the encryption process. You can continue using the computer during encryption, although performance may be slightly affected. The time required will depend on the drive size and whether you chose to encrypt the entire disk or just the used space.
Unlock and Authentication Methods
BitLocker offers several authentication methods that you can combine according to your security and convenience needs. Understanding each one will help you choose the most appropriate configuration for your situation.
Automatic Unlock with TPM
When you configure BitLocker to use only the TPM, unlocking is completely transparent. The TPM automatically verifies that the system has not been tampered with during boot and releases the encryption keys without user intervention. This method is the most convenient but offers less protection against sophisticated physical attacks.
Pre-boot PIN
Adding a pre-boot PIN means you'll need to enter a numeric code (6 to 20 digits) each time you turn on the computer, before Windows begins to load. This provides an additional layer of security because even if someone has physical access to your computer, they won't be able to boot it without knowing the PIN.
BitLocker Password
Similar to PIN but allowing alphanumeric characters, which significantly increases complexity and security. It's especially useful for secondary data drives that don't require unlocking during system boot.
USB Startup Key
You can configure BitLocker to require a specific USB drive to boot the system. The encryption key is stored on this drive, and without it, the computer won't be able to access the disk data. It's a useful option for systems without TPM or for those who want additional physical security.
Smart Card
In enterprise environments, BitLocker can be configured to use smart cards as an authentication method. This requires additional infrastructure but provides a very high level of security and allows centralized management.
Recovery Key Management
The recovery key is your lifeline if something goes wrong with BitLocker. It's absolutely essential that you store it securely and know how to find it when you need it.
When You'll Need the Recovery Key
- If you forget your BitLocker PIN or password.
- After updating the BIOS or UEFI firmware.
- If you change critical hardware components (motherboard, TPM).
- If the TPM detects suspicious changes in the boot configuration.
- If you enter the wrong PIN too many times.
- After certain types of Windows updates.
How to Find Your Recovery Key
If you saved the key to your Microsoft account, you can retrieve it by following these steps:
- From another device, go to account.microsoft.com/devices/recoverykey.
- Sign in with the same Microsoft account you used on the computer with BitLocker.
- You'll see a list of recovery keys associated with your devices.
- Locate the corresponding key using the key ID that appears on the BitLocker recovery screen.
Best Practices for the Recovery Key
- Save the key in multiple secure locations.
- Don't store the key on the same device you're protecting.
- If you print the key, store it in a safe place like a safe.
- Consider using a secure password manager to store the key.
- In enterprise environments, ensure the IT department has access to recovery keys.
BitLocker To Go: Encrypt USB Drives
BitLocker To Go is an extension of BitLocker that allows you to encrypt removable drives such as USB flash drives, external hard drives, and memory cards. It's an invaluable tool for protecting data that you physically transport from one place to another.
How to Enable BitLocker To Go
- Connect the USB drive you want to encrypt.
- Open File Explorer and right-click on the drive.
- Select Turn on BitLocker.
- Choose to use a password to unlock the drive (it's the most common option for removable drives).
- Create a strong password and confirm it.
- Save the recovery key using one of the available methods.
- Choose to encrypt only used space or the entire drive.
- Select the encryption mode (use compatible mode if you plan to use the drive on older Windows computers).
- Start the encryption process.
Using Drives Encrypted with BitLocker To Go
Once encrypted, every time you connect the drive to a Windows computer, you'll be asked for the password to access the data. Windows will show a lock icon on the drive to indicate it's protected with BitLocker.
On computers with older Windows versions or operating systems that don't natively support BitLocker, you can use the BitLocker To Go Reader included on the drive (if you chose compatible mode) to access the data in read-only mode.
How to Manage and Disable BitLocker
Once BitLocker is active, you can manage various aspects of its configuration from the Control Panel.
Temporarily Suspend BitLocker
If you need to perform BIOS updates, install new hardware, or perform other tasks that might trigger BitLocker recovery, you can temporarily suspend protection:
- Open the BitLocker Control Panel.
- Next to the protected drive, click Suspend protection.
- Confirm the action.
- Protection will automatically reactivate on the next restart or you can reactivate it manually.
Change Password or PIN
- Open the BitLocker Control Panel.
- Click Change password or Change PIN next to the corresponding drive.
- Enter the current password and then the new one.
Add an Additional Recovery Key
- Open the BitLocker Control Panel.
- Click Back up your recovery key.
- Choose where to save the new copy of the key.
Completely Disable BitLocker
If you decide you no longer need BitLocker protection, you can disable it:
- Open the BitLocker Control Panel.
- Click Turn off BitLocker next to the drive.
- Confirm the action.
- The decryption process will begin. This can take several hours depending on the drive size.
Note that during the decryption process, your data will remain accessible and you can continue using the computer normally.
Troubleshooting Common Issues
Although BitLocker is generally reliable, occasional problems can arise. Here's how to solve the most common ones.
BitLocker Asks for Recovery Key Unexpectedly
This can happen for several reasons:
- Firmware updates: After updating the BIOS or UEFI, the TPM may detect changes and request recovery. Use your recovery key and the system should work normally afterward.
- Hardware changes: Adding or removing components can trigger recovery.
- Tampering attempts: BitLocker is doing its job by detecting possible threats.
I Can't Find the BitLocker Option
If you don't see the BitLocker option in Control Panel:
- Verify that you have a Windows edition that includes BitLocker (Pro, Enterprise, or Education).
- Make sure the BitLocker encryption service is running (search for "Services" in the Start menu and verify that "BitLocker Drive Encryption Service" is started).
- Check that your disk uses the GPT partition scheme and not MBR for UEFI boot.
Encryption is Taking Too Long
Encryption time depends on several factors:
- The drive size.
- Whether you chose to encrypt the entire drive or just the used space.
- Disk performance (SSDs are much faster than HDDs).
- System workload while encryption is being performed.
You can continue using the computer during encryption. If you need to shut down the computer, the process will automatically resume when you turn it back on.
"BitLocker could not encrypt this drive" Error
This error can be due to:
- TPM problems. Try clearing the TPM from tpm.msc and reconfiguring it.
- Incorrect disk partitions. It may be necessary to recreate the system partitions.
- Group policies preventing BitLocker activation.
Security Best Practices
To get the most out of BitLocker's protection, follow these recommendations:
Use Multi-Factor Authentication
Configure BitLocker to require both TPM and a PIN. This means an attacker would need physical access to your computer AND know your PIN to access the data.
Keep Your System Updated
Windows updates frequently include security improvements for BitLocker. Keeping your system updated ensures you're protected against the latest threats. To enjoy the best security features, consider getting an updated Windows license that allows you to access all protection features.
Also Protect Your Removable Drives
Use BitLocker To Go for any USB drive or external disk where you store sensitive data. These drives are especially vulnerable to theft or loss.
Implement a Recovery Key Policy
Establish a system for managing recovery keys:
- Document where keys are stored.
- Periodically review that keys are still accessible.
- In enterprise environments, use Active Directory or Microsoft Intune for centralized management.
Combine BitLocker with Other Security Measures
BitLocker is one layer of protection, but it shouldn't be the only one:
- Use strong passwords for your Windows account.
- Enable Windows Hello for biometric authentication if your device supports it.
- Keep an updated antivirus.
- Perform regular backups of your important data.
Frequently Asked Questions
Does BitLocker affect computer performance?
The performance impact is minimal on modern computers with hardware support for AES encryption. Most users won't notice any difference in daily use. Modern SSDs and current processors include specific instructions to accelerate encryption operations.
Can I use BitLocker on Windows Home?
Full BitLocker is not available on Windows Home. However, Windows Home includes "Device encryption" on some computers that meet certain hardware requirements. For full BitLocker functionality, you'll need Windows Pro or higher.
What happens if I lose my recovery key?
Without the recovery key, if something goes wrong and BitLocker enters recovery mode, you won't be able to access your data. It's absolutely critical to store the recovery key in a safe and accessible place. If you lose the key and can't unlock the drive, the data will be unrecoverable.
Can I move a BitLocker-encrypted disk to another computer?
Yes, but you'll need the recovery key or BitLocker password to access the data on the new computer. Secondary data drives and USB drives encrypted with BitLocker To Go are easy to use on other Windows systems.
Does BitLocker protect against viruses and malware?
Not directly. BitLocker protects your data against unauthorized access when the computer is turned off. Once the system is on and unlocked, malware can access the data just like any other program. You need a separate antivirus to protect against malware.
How long does initial encryption take?
It depends on the drive size and whether you chose to encrypt the entire disk or just the used space. For a 500 GB SSD encrypting only used space, it can take between 30 minutes and a few hours. Encrypting a complete multi-terabyte HDD can take an entire day.
Conclusion
BitLocker is a powerful and accessible security tool that should be part of any Windows user's data protection strategy. Whether you're protecting sensitive personal information or confidential corporate data, full disk encryption provides a fundamental layer of security that can make the difference between a simple annoyance and a catastrophe in case of device loss or theft.
Enabling BitLocker is a relatively simple process that only requires a few minutes of your time, but the benefits in terms of security and peace of mind are invaluable. Always remember to save your recovery key in a safe place, consider using multi-factor authentication for greater protection, and keep your operating system updated to benefit from the latest security improvements.
The security of your data is in your hands. With BitLocker and proper practices, you can be confident that your information will remain protected even in the most adverse scenarios.
To access BitLocker and other advanced security features, you need Windows Pro. At Licendi we offer original Windows licenses at competitive prices with immediate activation and technical support included.